I finally watched this movie last night. I had heard about it and wanted to see what it was about or how it went.
I don't like to post negative things on here, but as I am starting to watch some of the horror movies and wanted to post my opinion on them, now and then, I am going to run across what I feel is a bomb.
This is a Quentin Tarantino movie. I am not a huge fan.
I found the start to be very bizarre and creepy and it didn't seem to make sense until towards the end and then it does as to what you were seeing.
This is set at the start in Amsterdam about three backpackers, two from America and one from Iceland I believe he was. The thing is, they never really do any backpacking at all. It's just about these three guys wandering Europe on a train with a backpack on their back and going to a hostel to which they get more than what they bargained for.
(Warning! Spoiler as to what is going on written below)
Just what were they bargaining for? Sex. Pure and simple that's what it was they were looking for. They end up stumbling right into a black market/set up for torture and murder, blood and gore.
So yup, lots of gratuitious sex, female nudity, drugs and violence and bad language. This is definitely for mature audiences and not something you want your kids watching. It lingers a bit on the SAW type of movies, lots of blood and gore and nasty stuff that can turn your stomach.
Objectifying women, homophobe...yadda yadda you get the picture, or hopefully you avoid this one unless you just want to see lots of this sort of thing.
It nearly felt like it was geared for the bachelor party, if someone was to have one around this time of year or who likes the horror, blood and gore type of thing.
Of course like most Tarantino's movies, a bit of a twist and I thought the kid mob looking for gum was the quirky fun part of the movie.
It takes a while to get to the horror parts but once it starts, it's hardcore all the way.
I have to say I expected them all to die, but no, we had a hero escape and exact revenge.
This one was just not my cup of tea.
So I'd give this one like a 1 GP rating out of 5. I did like the suspense apsects but other than that? Nah.

Friday, October 17, 2014
Friday, October 3, 2014
Hazards of Making Haunt Props
There are a lot of hazards to making your own props. Most of it is just using common sense, but there are things that can happen that you don't think about or if you are in a hurry and don't take the time to think about all the what-ifs.
First, anything that you are doing that makes little pieces or parts or dust-like particles, whether it is cutting wood or pvc pipe or even if you are spray painting or using that all purpose fun Great Stuff, I'd recommend wearing goggles to protect your eyes.

Cutting wood, saw dust, bits of wood come flying out under an electric saw or even splintering with a hand saw. Those bits and pieces can fly up into your eyes before your know it.
PVC? Oh yes! I use a mitre saw to cut all the pvc pipe as I use some very large pieces and it's hard to cut it with a hand tool, so using a fine blade turned backwards, (trick my Uncle told me of) it melts the pvc edge to make a finer one but there are tons of melted shavings that will adhere on to anything and everything, including your eyes. So goggles are definitely called for.
Spray paint is a given, you'd be surprised how far that stuff flies in the air and gets on everything. I worried about it spraying into my eyes with the wind and forever seeing the world thru a speckled black lens. No thanks, goggles again.

Great Stuff. Oh boy...those are pressurized cans and they can and have been known to explode at times. And that stuff, is just really super difficult stuff to get off and well you really don't want it in your eyes or else you will need to flush your eyes out and seek medical attention PRONTO. ALWAYS use goggles. This is bad to just get on your skin! Check out this link that explains more about Great Stuff and what to do should you get it on your skin:
Directly from that site in case you can't open it:
A.
Eye contact with wet foam may
cause irritation or injury. If the foam
dries and hardens on the eye, it
becomes diffi cult to remove and will
be painful.
FIRST AID: Flush eyes
with water for 15 minutes. Seek
medical attention.
B. Prolonged skin
contact with wet, uncured foam may cause
irritation and may stain skin. Skin contact may cause an
allergic
reaction or lead to respiratory sensitization. If
wet or uncured
foam
gets on skin, quickly and carefully wipe it off using a
cloth
without spreading the foam around; wash with soap and water.
Within minutes, wet foam will dry and bond to surfaces and
skin.
Once the foam has dried, it cannot be removed with any
solvents
or cleansers.
Cured foam
that has dried onto skin or surfaces
must be mechanically removed or allowed to wear off in time.
Frequent soaking of the skin in warm, soapy water followed
by
application of petroleum jelly or vegetable oil may help.
The use
of a pumice stone or gritty cleansers may
also help remove cured foam. These
materials should not be used on the face
or on areas with a lot of hair.
FIRST AID:
Wash skin with plenty of soap and
water. If pain or irritation persists,
seek medical attention
I also use gloves, especially when I am working with Great Stuff. I also wear long sleeves, pants and a t-shirt that I don't care much about. Its the same with Monster Mud, you WILL get it on you, some way, some how. Great Stuff, you have to be really careful to not get it on you. It's possible but it's best to protect yourself when using it for the "oh sh*t" moments. Cause they happen more often and even to those who are experienced with prop making.

Most things are common sense, but I can't stress enough how important it is to protect your eyes above all!
I also would recommend using a mask over your nose and mouth as you don't want to be breathing in any fumes like with the Great Stuff or the spray paint.
When working with anything electric, its best to always be ever mindful where the cords are, and the top thing is to pay attention to where your fingers are in relation to the blade at all times.
If you have long hair, be sure and keep it tied up in back with nothing hanging down so it doesn't get caught up in anything. It can happen in an instant.
Have fun and be safe out there!
Monday, September 29, 2014
It has begun....So far!
I wanted to get these pics up to let you all see what the front lawn looks like so far. We began this past weekend and got right to it in setting up the circle of ghosts first. This was a bit difficult as I really wanted it in the cemetery itself so no one would mess with them, but as we began to set the cemetery fence, I realized I didn't have enough fencing. So we had to cut off the size of the graveyard to fit. I wanted it a lot larger but I really do not want to buy more fencing, not when we have learned how to make our own and I'd rather we replaced all of these with ones we made ourselves.

I chose to put the ghosts there alongside the blank wall of the house and we have them lit with two green floodlights. I also had to use a shepherd's hook so that the skeleton hammock guy could be stretched across the open area there by the front door. The only bad thing is that it makes the post man and UPS man have to walk around, through the graveyard. Once I close up the gap that we have, they will have to go all the way around or just slide the box under the hammock skeleton. This is the hammock skeleton you see in the stores. It is A LOT smaller than you may think.
I did add the skeleton wooden chimes I picked up from the Seashell Shop in Rehoboth Beach. They have some awesome fudge there too by the by.

We did manage to get a lot of boxes taken over to storage and I began to look through the boxes in the house and found more tombstones so I will get to place those as well hopefully tomorrow. I ordered a few more things that I needed and checked off items in the to-do list. Everything is going pretty well tho' I am starting to run out of time and won't be able to do all that I have been wanting, as usual. I still need to redo my tombstones. That's a huge project. I have all the tools for it, just need time but there are other priorities first so for now, I touched up what I have with some gray paint and the new tombstone I made at the Davis Family's tombstone class, I was able to glue in the pvc pipe to the channels they had cut and painted the back and will sand down any glue blobs and finish painting that area too and then I can place that one out into the graveyard. It's one of my favorites now!
I chose to put the ghosts there alongside the blank wall of the house and we have them lit with two green floodlights. I also had to use a shepherd's hook so that the skeleton hammock guy could be stretched across the open area there by the front door. The only bad thing is that it makes the post man and UPS man have to walk around, through the graveyard. Once I close up the gap that we have, they will have to go all the way around or just slide the box under the hammock skeleton. This is the hammock skeleton you see in the stores. It is A LOT smaller than you may think.
I did add the skeleton wooden chimes I picked up from the Seashell Shop in Rehoboth Beach. They have some awesome fudge there too by the by.
Here is the fencing I mentioned. You can see the gap where it ended there in the upper right corner. I want to enclose it at that point so that kids won't be tempted to just walk on thru and trip over all the cords that I know will end up on the lawn.
I adore those solar tubes, you can see the one there in orange next to the sign. I have another yellow one you can just barely see in the upper left, that isn't working and I will have to see what I can do about fixing it or replacing it.
In the center there to the right of the pumpkins has become a tribute to Marie Laveau, the Voodoo Queen from New Orleans. I have a tombstone for her, a voodoo doll I made and some zombie heads there near her and this year, we added some solar weeping willow LED lights to frame it. I really love those willow trees! They are really great and I don't remember where I got them!
Under the tree to the right is one of those garden gnomes all skeleton, digging. I may make this sort of like the fairy mound and put more gnomes there or something. Honey bees are all over this tree and I can only guess they are after the sap because it's a non-flowering tree.
The three pumpkins you see are fake and on a haystack. These will be lit with the pumpkin projections I got and I'll do a review of them later on once I get it all set up. I have to build a tomb for in front of it so it can house the projector and iPod and the speaker receiver.
I've added more tombstones to the graveyard and will get some pics tomorrow when the sun comes out more. We got the graveyard lit however with some color changing LED lights. I need to replace the green floodlights under the ghosts with those so we are not drawing so much electricity.
We also were able to set up the Hallowindow/video projections in the windows above the garage. That took some doing as I had picked up new cables and they didn't work for the iPod Classic, only for the touch, so be careful when you buy the A/V cables, make sure everything will work with the type of device you have. I updated that blog post from before too.
I also dry brushed all the skeletons so they are all ready to go for corpsing. I hope to do that this week. I need to get them done, skinned and painted and then attached to their poles so they are out of the way.
We did manage to get a lot of boxes taken over to storage and I began to look through the boxes in the house and found more tombstones so I will get to place those as well hopefully tomorrow. I ordered a few more things that I needed and checked off items in the to-do list. Everything is going pretty well tho' I am starting to run out of time and won't be able to do all that I have been wanting, as usual. I still need to redo my tombstones. That's a huge project. I have all the tools for it, just need time but there are other priorities first so for now, I touched up what I have with some gray paint and the new tombstone I made at the Davis Family's tombstone class, I was able to glue in the pvc pipe to the channels they had cut and painted the back and will sand down any glue blobs and finish painting that area too and then I can place that one out into the graveyard. It's one of my favorites now!
Eventually, I will redo all the tombstones and get rid of the old ones or commercial ones, resell or give them away.
I do want to say too, that I really feel more like a real haunt this year. Made a flyer and dropped it off at the community center so that kids will know we are here.
I still hope to get to make the paper mache monsters for the cave! For now, still need some rest and want to conk out. Busy day tomorrow!
More pics and updates to come!!
Wednesday, September 3, 2014
What I've Been Up To...
I know I've been a bit quiet as of late but it's because I've been super busy! After moving here to DE and to a townhouse that is a lot smaller than the big home I had in Texas, it's been a big adjustment.
For Halloween, it meant that I could not use the gazebo, but instead, I had to put together a pvc pipe framework inside the garage and the side workroom. I kept with the same idea of having a haunted cave and a bit of a path to do a "U" turn inside the garage itself and then instead of stepping into the black-lit cave itself, this time, to just go by it.


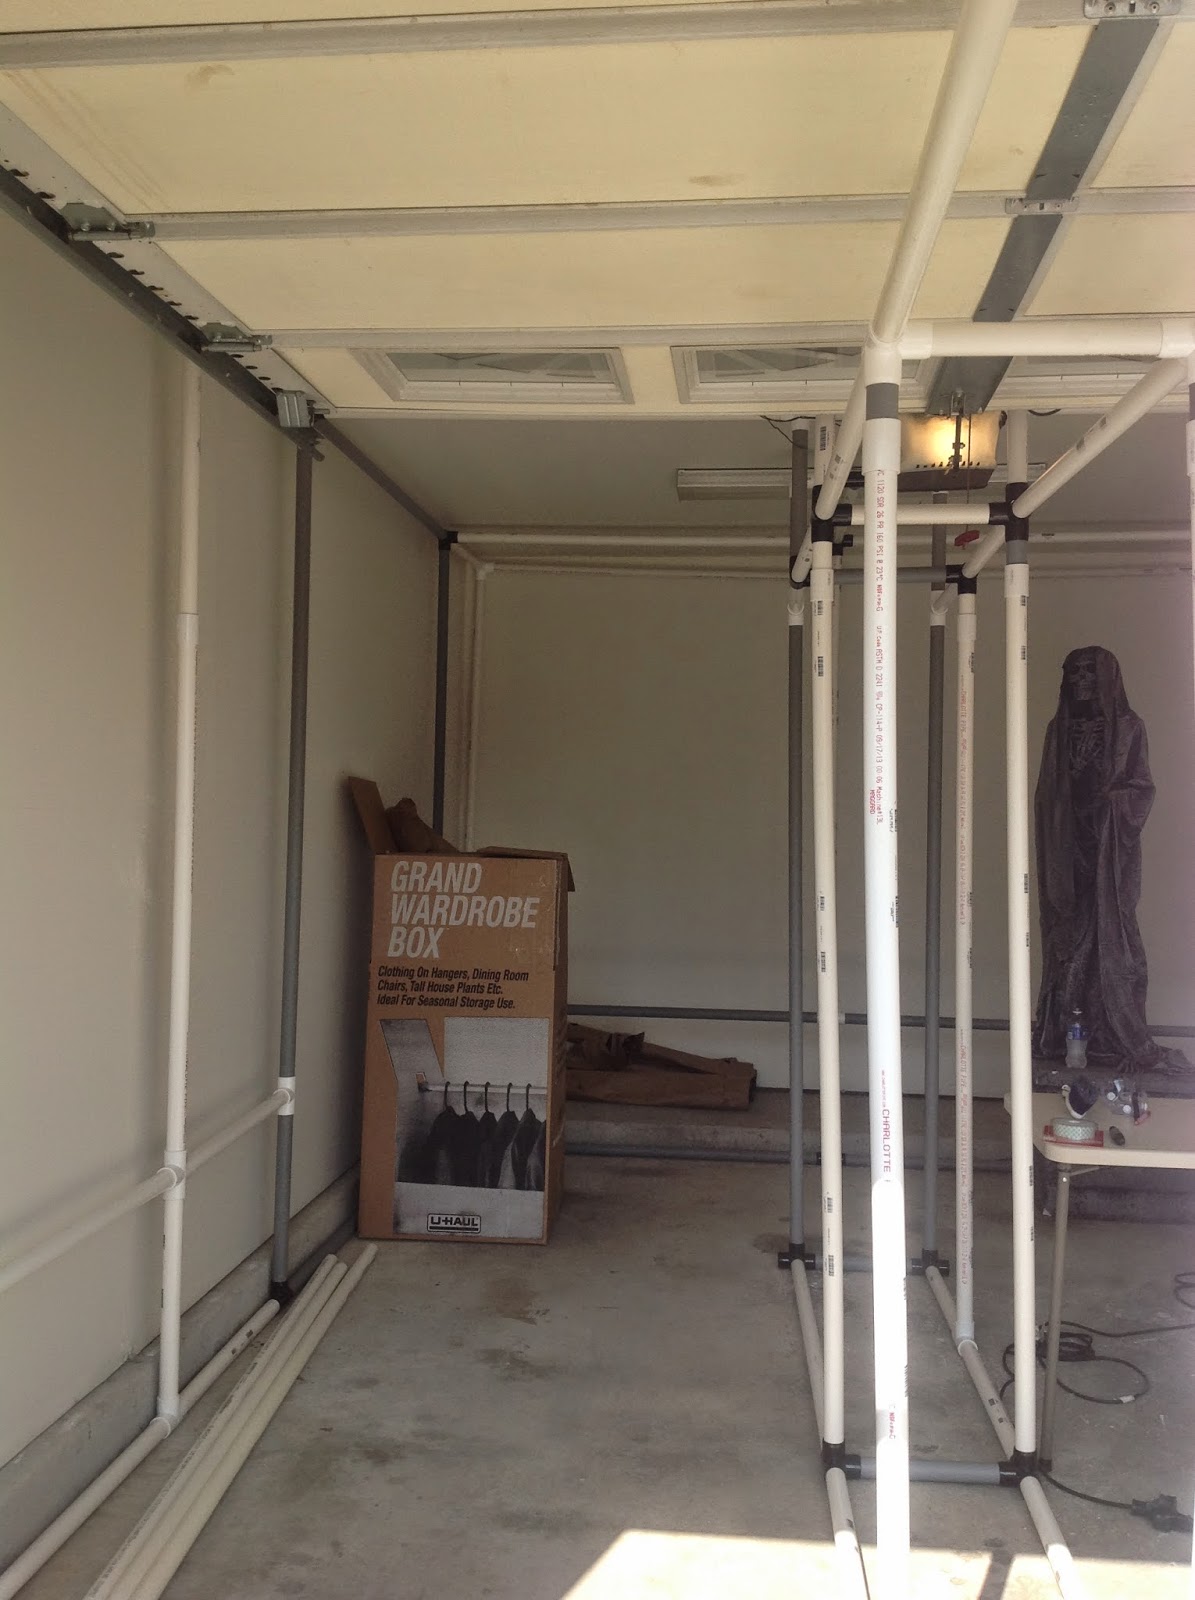


The reason I did that instead of having the kids go inside it is because there is a step up to go into the workroom/cave and I didn't want any of the trick or treaters (fondly known as ToTs) to trip or fall. I know many kids can have elaborate costumes and their vision is impaired or compromised while wearing masks and they may not see that step so I felt it was best to just avoid that situation completely. To further dissuade them from not going up there, I've built a half fence in front so they will feel they can't go up there. I started out with pvc pipe frame and I'll be zip-tying some plastic chain link fencing to it that I'll cut to fit in the coming weeks.
This is the workroom area:

Now of course the pvc piping is not the only progress we've made! :) We have already began to put up the black sheets on the walls and cover the ceiling as well. The pvc pipe really helped a lot to make this so much easier. We also un-safety-pinned the camoflauge netting from the black sheets and began to attach that to the ceiling. I used the brown paper for the background in the cave room that I had splooged with black latex paint last year. I'll need to make some more to fill in the few areas that are still bare walls.


You can see what a difference a bit of black sheet can do and how dark it makes it in there! That's the Evil Entity behind the bars there in the corner of the cave. I will be painting the bars black/dark grey so they look more like bars of a cage. I won't do anything fancy like apply rust to them as the Evil Entity, who we used before as the Spider King last year, moves up and down and rubs on the bars and I don't want him to get stuck or get that on him. So I'll paint the bars smooth and mostly just on 3/4 of the bars and not directly behind him.
We also added some black lights to the cave, two of the long ones, zip-tied them up to the ceiling. I have another I may angle from the floor or utilize in another area in the cave to help light it up well. I might put it more so out into the walkway so that the kids get to light up as well when they reach that point to get their candy.
Now I am hoping to make a large cauldron for the middle area of the cave. I am starting to run out of time however so we'll see how that goes. It's an indoor thing so I can be working on it too all of October which I will probably need a fair amount of time to get it completed to how I want it to look.
Meanwhile, this weekend we will be covering those white shelves with black trash bags and I'll paint more brown paper to match the other sheets already on the walls there. I may also go around and paint some of the pvc pipe black. And yes, ideally, I should have done that before we put them together but we were in a hurry to get this part set up and I thought I would be covering them entirely but turns out no, so I'll have to do the painting afterwards, not a big deal really.
The Evil Entity barely fit behind those bars! I wasn't sure if he would but it all worked out. Not too shabby for mostly eyeballing it and not planning it exactly with measurements!
Oh and that is the Time piece from the graveyard last year that I had won from the Davis Family's graveyard class at Hauntcon. We had to toss a black sheet over him as this one lady stood out on the sidewalk just gawking at it. We didn't want anyone to really know what we were doing just yet. They'll find out soon enough! Muuahahhaa!
On another note (said I was busy!), I have been reading and following the various Halloween Home Haunters and DIY groups on Facebook. If you are wanting some good quality props and you have Facebook, you really need to join these groups! What a great lot of talented folks there and all so very nice and friendly and willing to help you with suggestions or how-to's! It is nearly overwhelming and hard to know just where to start. I just absolutely love it. And I say good quality props because YOU would be making them and not buying them from a store. I have to say I am becoming disappointed with some of the poor quality some of the stores are putting out. Some places, yes, they have some good quality items but it all comes down to buyer beware and beware inDEED!! It's scary out there. I look at it all tho' like this: if you buy a prop from a store and it breaks, most of the Halloween stores do have great customer service and will help you out, but if not, learn how to fix it yourself or you can take what you purchased and build on it! Add to this prop and make it better.
I never really thought about painting some of the props, like you know the rats? Those plastic rats? Just didn't cross my mind and you know, I saw some people paint them and just wow! How great and so utterly fantastic they look and it didn't take much at all! You don't have to be Picasso or Rembrandt, just a little dab or two or ten and wha~la! you have a grand masterpiece! Of course remembering that it is pretty dark too but still, some items really come out looking so much better when they get a little tender lovin care from you! :)
I want to talk about another idea too that I ran across and I bought the book and I am going to give it a whirl soon but I'll leave that for the next post, coming soon!!
What else is coming? More pics, more props, more book & movie reviews/recommendations/info and lots of creative ideas! And yes, maybe even more recipes! I will also be adding a lot more links too as I get thru everything.
Oh and ummm yes...I know, I still need to talk about Hauntcon and Transworld Halloween Tradeshow and yessss Scarefest!! Stay tuned as I am settling in more and getting everything organized.
Til then, let the countdown continue!
~*Bugs n Hisses*~
Wanda
For Halloween, it meant that I could not use the gazebo, but instead, I had to put together a pvc pipe framework inside the garage and the side workroom. I kept with the same idea of having a haunted cave and a bit of a path to do a "U" turn inside the garage itself and then instead of stepping into the black-lit cave itself, this time, to just go by it.
This is the workroom area:
Now of course the pvc piping is not the only progress we've made! :) We have already began to put up the black sheets on the walls and cover the ceiling as well. The pvc pipe really helped a lot to make this so much easier. We also un-safety-pinned the camoflauge netting from the black sheets and began to attach that to the ceiling. I used the brown paper for the background in the cave room that I had splooged with black latex paint last year. I'll need to make some more to fill in the few areas that are still bare walls.
You can see what a difference a bit of black sheet can do and how dark it makes it in there! That's the Evil Entity behind the bars there in the corner of the cave. I will be painting the bars black/dark grey so they look more like bars of a cage. I won't do anything fancy like apply rust to them as the Evil Entity, who we used before as the Spider King last year, moves up and down and rubs on the bars and I don't want him to get stuck or get that on him. So I'll paint the bars smooth and mostly just on 3/4 of the bars and not directly behind him.
We also added some black lights to the cave, two of the long ones, zip-tied them up to the ceiling. I have another I may angle from the floor or utilize in another area in the cave to help light it up well. I might put it more so out into the walkway so that the kids get to light up as well when they reach that point to get their candy.
Now I am hoping to make a large cauldron for the middle area of the cave. I am starting to run out of time however so we'll see how that goes. It's an indoor thing so I can be working on it too all of October which I will probably need a fair amount of time to get it completed to how I want it to look.
Meanwhile, this weekend we will be covering those white shelves with black trash bags and I'll paint more brown paper to match the other sheets already on the walls there. I may also go around and paint some of the pvc pipe black. And yes, ideally, I should have done that before we put them together but we were in a hurry to get this part set up and I thought I would be covering them entirely but turns out no, so I'll have to do the painting afterwards, not a big deal really.
The Evil Entity barely fit behind those bars! I wasn't sure if he would but it all worked out. Not too shabby for mostly eyeballing it and not planning it exactly with measurements!
Oh and that is the Time piece from the graveyard last year that I had won from the Davis Family's graveyard class at Hauntcon. We had to toss a black sheet over him as this one lady stood out on the sidewalk just gawking at it. We didn't want anyone to really know what we were doing just yet. They'll find out soon enough! Muuahahhaa!
On another note (said I was busy!), I have been reading and following the various Halloween Home Haunters and DIY groups on Facebook. If you are wanting some good quality props and you have Facebook, you really need to join these groups! What a great lot of talented folks there and all so very nice and friendly and willing to help you with suggestions or how-to's! It is nearly overwhelming and hard to know just where to start. I just absolutely love it. And I say good quality props because YOU would be making them and not buying them from a store. I have to say I am becoming disappointed with some of the poor quality some of the stores are putting out. Some places, yes, they have some good quality items but it all comes down to buyer beware and beware inDEED!! It's scary out there. I look at it all tho' like this: if you buy a prop from a store and it breaks, most of the Halloween stores do have great customer service and will help you out, but if not, learn how to fix it yourself or you can take what you purchased and build on it! Add to this prop and make it better.
I never really thought about painting some of the props, like you know the rats? Those plastic rats? Just didn't cross my mind and you know, I saw some people paint them and just wow! How great and so utterly fantastic they look and it didn't take much at all! You don't have to be Picasso or Rembrandt, just a little dab or two or ten and wha~la! you have a grand masterpiece! Of course remembering that it is pretty dark too but still, some items really come out looking so much better when they get a little tender lovin care from you! :)
I want to talk about another idea too that I ran across and I bought the book and I am going to give it a whirl soon but I'll leave that for the next post, coming soon!!
What else is coming? More pics, more props, more book & movie reviews/recommendations/info and lots of creative ideas! And yes, maybe even more recipes! I will also be adding a lot more links too as I get thru everything.
Oh and ummm yes...I know, I still need to talk about Hauntcon and Transworld Halloween Tradeshow and yessss Scarefest!! Stay tuned as I am settling in more and getting everything organized.
Til then, let the countdown continue!
~*Bugs n Hisses*~
Wanda
Tuesday, August 5, 2014
WOWindow Posters
If you have not yet seen these window posters, you really need to check them out!


I picked up some of these a few years ago and was so pleased with how they come out that I had to get some more!
While at a Halloween convention, I was able to meet some of the people who work at WOWindow Posters as I visited their booth and told them what sort of home haunt I put together and how much I just love their posters! They were so nice. :)
This year, they have new skulls to make it look like your house is filled with them like in the catacombs in Paris or Edinburgh! I was so excited that I had just had to order them!

How these work is that you tape them up in your windows on the inside and then leave a light on at night and they light up/glow! The light illuminates them from behind and they seem to just come alive! You can also use a strobe light behind them and make them really pop!
I thought they were really great! I have several of them and like the zombie ones with the orange background? When the sun shines on them in the day, it makes my whole room just glow orange! It was really cool.
I thought they were really great! I have several of them and like the zombie ones with the orange background? When the sun shines on them in the day, it makes my whole room just glow orange! It was really cool.

What is also nice about these posters is that they are made of plastic and so you can just take them down and use them again next year.
Take a peek at them on their site and choose your favorite. You can also get them at Oriental Trading, Spirit Halloween and many other stores!
Wednesday, July 16, 2014
Sipping Spiders Through A Straw, Campfire Songs for Monsters
Lyrics by: Kelly Dipucchio & Pictures by: Gris Grimly

The title gotcha didn't it? It did me too when I was walking through the grocery store aisle with all the paper and office supplies, the books and magazine section and there in the bin, was this book.
I had to pick it up and look thru it and I found myself just laughing as I sang along to the funny lyrics of famous campfire songs, changed to be more icky, creepy and oh yes, just fun, fun, fun!

I had to buy two of these in fact so I could send one off to friends. :) I added it to my collection of books that I would like to one day read/sing along with elementary kids when I am settled and can volunteer at the local school to come in and read for them during story time.
Some of the titles include:
Do Your Guts Hang Low?
Take Me Out To The Graveyard
Creepy, Creepy, Little Jar
and well, you get the picture! ;)
They are just wickedly great for Halloween and I just had to share!
~*~Bugs n Hisses~*~
GP
The title gotcha didn't it? It did me too when I was walking through the grocery store aisle with all the paper and office supplies, the books and magazine section and there in the bin, was this book.
I had to pick it up and look thru it and I found myself just laughing as I sang along to the funny lyrics of famous campfire songs, changed to be more icky, creepy and oh yes, just fun, fun, fun!
I had to buy two of these in fact so I could send one off to friends. :) I added it to my collection of books that I would like to one day read/sing along with elementary kids when I am settled and can volunteer at the local school to come in and read for them during story time.
Some of the titles include:
Do Your Guts Hang Low?
Take Me Out To The Graveyard
Creepy, Creepy, Little Jar
and well, you get the picture! ;)
They are just wickedly great for Halloween and I just had to share!
~*~Bugs n Hisses~*~
GP
Subscribe to:
Posts (Atom)